 There are a lot of different ways to wire your switches and
it also depends on what kind of material you use or have. I'm using EMDA2
cards and therefore will describe a way to wire your switches using these
cards.
There are a lot of different ways to wire your switches and
it also depends on what kind of material you use or have. I'm using EMDA2
cards and therefore will describe a way to wire your switches using these
cards.
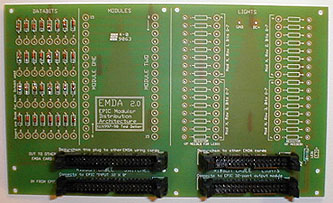
Let me tell you why I chose the EMDA2 card, as there are
different opinions about how useful this card really is. I decided to go
for this card because you can solder all diodes (required for the switches)
and resistors (required for the LED's) on this board and you therefore
don't have to worry about where to place them. You can mount the EMDA2
on the back of your sidepanels and wire your switches and lights to the
card. Then you simply daysichain your EMDA2 cards together and connect
them to the expansion module.
Let's start right off with soldering the diodes in place.
If you look at the card, you see "DATABITS" written in the top left corner.
This is the section we are going to work with. If you look at the section,
you see a drawing where the diodes need to be soldered. Solder common diodes
(I use 1N4148 75V/75mA ones), one for each switch into place and take care
that the orientation of your diode is as shown.
Now solder a wire to the first Databit (0) and connect it
with one leg of your switch. Using another wire, connect the other leg
of your switch with row 0 on module one. All you need to do now is to connect
your first expansion module with the EMDA2 card using a 40 ribbon wire.
That's all hardware work we need to do here, let's go for
programming of that switch.
First we need to tell EPIC to scan that module row, so we
will be able to see which switchnumber we have.
#Define SLOWSCAN
1
Definemodule(1,SLOWSCAN,0,16)
|
Save this file into a folder of your choice.
Compile and load the file you just wrote and run Test128.
Click on "SelectModule" and select the number according to your definemodule
statement. Flip the switch and notice which number becomes active.
You can use this number now just like you did with the
switches before, except that you need a second definemodule statement,
as in the example above.
Note:
If you soldered your switch to module row 2, you need to
define (and select) your module as number 2.
