|
Introduction
 Our squadron is dedicated to LAN flight simming. During the coarse of a
weekend, things can get pretty hectic in the sim. Having mutually supporting
missions allows us to really get into the meat of a flight sim. With the
amount of humans assigned to different mission roles, effectively communicating
with each other can get very difficult. Team play or H2H play is even more
difficult as that whatever happens in your bandit reports or position reports
is heard through out the room. When engaged, Having the ability to hear
if you've damaged you opponent is very unrealistic. This significantly
lessens the impact of what the game could offer. Other times the room can
be filled with others trying to play different games. The solution was
obvious. We had to find an intercom system.
Our squadron is dedicated to LAN flight simming. During the coarse of a
weekend, things can get pretty hectic in the sim. Having mutually supporting
missions allows us to really get into the meat of a flight sim. With the
amount of humans assigned to different mission roles, effectively communicating
with each other can get very difficult. Team play or H2H play is even more
difficult as that whatever happens in your bandit reports or position reports
is heard through out the room. When engaged, Having the ability to hear
if you've damaged you opponent is very unrealistic. This significantly
lessens the impact of what the game could offer. Other times the room can
be filled with others trying to play different games. The solution was
obvious. We had to find an intercom system. |
| Why not
an Intercom?
In deciding
on an intercom system we had a number of things to consider. There are
many intercom systems available. Electronic equipment stores and even some
department stores can offer intercom systems. The designs for intercoms
can be found at the library. A dedicated intercom system offers great sound
quality and a lack of RF interference. It also has many drawbacks. Intercom
systems can cost many hundreds of dollars. This is lessened if you build
one yourself but do you have the time OR the know how? Price versus channels
is another drawback. As stated what we needed was something that would
allow us to separate one mission or game from the next. A retail intercom
system with multiple channels certainly gets very high in price. The biggest
drawback is the lack of flexibility. when an intercom system is purchased
or built. It is a fixed item. when others join the group, modifications
must be made to the entire group. when your group gets large enough you
will quickly exceed the capacity of the intercom to work effectively. I
did not feel the intercom system would be appropriate as we are already
soaking tons of money into this hobby. Having to spend hundreds of dollars
for such A LIMITED system would not work for me.
|
| Now we're
talking.
Eventually the
idea of CB radios took shape. What it offers is multiple channels. We can
use 38 in our area. The CB's have 40 channels to select from but channel
9 is for emergency use ONLY and channel 17 is used by the local community
for general use. Others are used as well but significantly less so. A CB
can be purchased for around $35.00. Used CB's can be had for $15 dollars.
I purchased an extra 23 channel CB for $5 and it works great. Sound quality
is mediocre but have you heard any military radios? We also have to use
a PTT (Push to talk) switch. At this point it starts to sound and FEEL
very real. We found that any new member can be quickly adapted to the squadron.
No one modifies their system. He is the only one that spends any money.
Another drawback was the necessity for a power supply at an additional
$20-50. Most of us had power supplies laying around but unless they were
well built for 12V DC, gave us a hum in our system. The antenna was the
major drawback. A regular antenna was usually too powerful and would sometimes
send random keyboard commands if the system was improperly shielded or
located too close to your system. We found that removing the top of a two
piece antennae helped. We tried removing the antennae but ALL CB's are
subject to damage if you do that. We tried just a dummy load but we could
not broadcast across the room with that. Eventually we used a modified
dummy load/antenna set up. We also highly recommend the use of a pair of
headphones with large cups. These work much better to isolate outside noises.
I made a headset from garage sale headphones for $7.00! The other advantage
is that extra CB's or a CB frequency scanner can be purchased to operate
an AWACS station or actually record your flights. We have 2 CB's plugged
to a boom box to record all our flights. It makes for great beer drinking
background after the fly-in.
|
| Why CB's?
This setup is
also now used by the 555th in Oregon. In September of 1995, out two squadrons
and a few other pilots got together for a West Coast LAN meet. We were
able to assign TDY (temporary duty) positions as we all had CB's. The CB
portion went off without a hitch. We then recorded the flights for our
2V2 competitions. The stress and virtual-realism was unbelievable. This
epitomizes the flexibility and expandability of this setup.
|
| Let's
get real.
What about talking
on the mic? Almost none of us do this. Usually only the new guys or those
without the technical knowledge or time to modify their system. All of
us have some time of PTT switch mounted on the throttles. The throttle
mounted PTT switch is used in REAL aircraft. We could have purchased voice
actuated but we did not feel it was as realistic and it was much more money.
Some have their PTT switches mounted on the inside of their throttle. Others
have them affixed to the outside. We do have one guy that made a knee switch!
On my setup I have a TQS with the comms switch (duh!) wired to a relay.
This relay connects to TWO CB's so that I can have a flight channel and
a command frequency to monitor. The REAL f-16 has a 4 way comms switch
but I know that it has only two radios, a VHF and UHF. I don't know what
the other positions are used for in the block 50. The block 10 had only
a two way. This allows me effortless comms. I push down to talk to my flight,
I pull up to talk to other flights. I took the wires that were on the comms
switch and mounted 4 buttons on the base of my TQS so that I could still
have those 4 switches available. I guess sometime I'll have 4 radios and
talk to everyone, including the truckers. The easiest way to make a throttle
mounted PTT switch and mic setup is to modify the mic that came with the
CB. The connection to the mic can be lengthened and male and female connectors
placed so that you can unplug your headset. The switch is then mounted
on to the throttle.
|
| CB Radio
Communication
Using a hand
held mic in the middle of a furball is difficult if not fatal. Most of
the Delta Hawks have headset mounted boom mics. Some are home made and
some are store bought (Radio Shack has a nice stereo headset with boom
mic setup for about $60). To hook up a boom mic, you need to cut open the
CB hand held mic unit and connect up to the mic wires( remove the stock
mic, you may use this for a homemade boom mic unit). The hardest part is
locating your PTT (Push To Talk) switch in an easily accessible spot. We
have varied setups from cutting into TQS throttles and mounting switches
internally to creative hand held mic carving and judicious use of a hot
glue gun. Your best bet is to come to a meet and see what each of us has
already done.
|
| Making
a Headset.
Many members
of the 209th VFS Delta Hawks use an Optimus Pro50MX headset with boom microphone
from Radio Shack, these cost about $60. You can build your own for cheaper
if you wish.
Parts needed.
-
Isolation headphones
and the mic from your CB.
-
1/8 " Male STEREO
Jack.
-
2- 1/8" male MONO
jacks.
-
1/8" female STEREO
plug.
-
Appropriate sized
stereo plug for you headphones. (1/4" stereo or 1/8" stereo)
-
6 feet, 3 conductor
cable.
-
2 feet 1 conductor
shielded cable
-
2 feet flexible
14 gauge wire.
-
VERY small sheet
metal screw.
Open mic up. Cut
off the mic. Make sure you leave ample wire on the mic to allow soldering
later. Make a bracket from some flexible but stiff wire. (A coat hanger
works well for this). Use the sheet metal screw to attach one end to the
headset (make a tight loop to put the screw through). Cut and adjust bracket
to place mic just in front of your mouth. Solder enough wire to the mic
to reach from the end of your "boom" to your CB with ample slack. Connect
the exact same wires from the mono jack to the connections you made for
the mono plug to the PTT switch.
Cut 1 foot of
cable off. Ensure you slip the covers on the wires before you make connections.
Strip 1/8" off all ends. (4 ends now). Using the long wire, connect 1 cable
to tip end of stereo plug. Connect another end to the ring lug. Connect
the third ground or shield to the shield of the plug. Do this on both stereo
plug and jack. Using the 1 ft., coordinate and connect the appropriate
colored wires the headphone jack. On the other end, cut off the shield
wire and connect the other tip and ring wires to the tip and shield of
the mono plug. Solder all connections and screw covers on. Plug the 5 foot
wire into your sound card speaker jack. Plug the mono end in you CB EXT.
speaker jack. Plug you headphones in.Using the Radio shack headset all
you need to do is make a connector from the point on your PTT switch to
a female 1/8" mono plug. Connect the mic to the end.
|
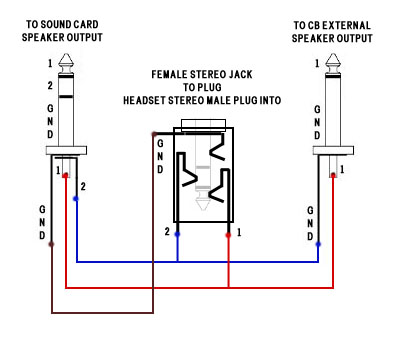
| Connections
for CB and Game Sound
Here is the
diagram for getting CB sound in both sides of a headset without losing
stereo game sound. All of the required parts are available at your local
electronics store for less than $10.00 total.
|

|
 To get CB Radio sound in both sides of a stereo HeadSet WITHOUT
losing stereo game sound. Connect both wires from a mono external speaker
jack to the "HOT" leads on a stereo jack.
To get CB Radio sound in both sides of a stereo HeadSet WITHOUT
losing stereo game sound. Connect both wires from a mono external speaker
jack to the "HOT" leads on a stereo jack.
The tip and the secondary connections
are used. The outer ring or "GROUND" lead is not used. Plug this adapter
into a stereo "Y" adapter. Plug your headset into the other female side
of the stereo "Y" connector and then plug the "Y" connector into the external
speaker jack on your sound card. Due to space constraints, you may need
to get a stereo extension cable, male to female, to go from your sound
card to the "Y" connector. |
Above is a store bought version. It
also uses a 6' Stereo Male to Female extension to go from the sound card
to the male end of the "Y" connector.
|
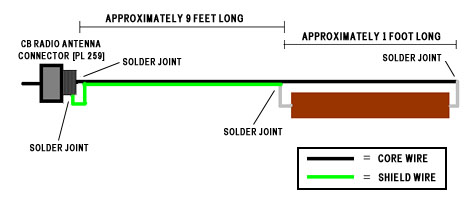
CB Short-range
Antenna
Parts needed.
-
PL259 antenna connector
-
10 feet of RG58
cable
-
50 ohm 5 watt resistor.
Cut 1 foot of wire.
Strip ends. Connect the antennas jack to one end. Solder the shield cable
to one end of the resistor. Solder the center cable to the other end. This
now provides 50 ohms of resistance. Strip about 4 inches on one end of
the remaining 9 ft of cable. Solder the shield to the same end as the resistor
with shield. Solder the cable end to the other side of the resistor with
the cable end. Strip 1 inch of cable from the other end of the 9 ft. cable.
Plug in antenna and run the cable anywhere.
|
Solder one end of a 50 ohm, 5 or 10 watt
resistor to the core wire of a 10 foot length of RG-58 COAX cable.
Solder the other end of the resistor
to the shielding wire of the cable. (Strip the outer insulation as far
back as
necessary to lay the resistor along
the wire). Solder the other end of the core wire to the center tip of a
PL-259
CB connector, Solder the outer
shield wire to the outer casing of the connector. |
|
| PTT (Push
To Talk) Switch
The PTT switch
is made easiest by mounting your existing PTT switch from the CB on the
throttle with hot glue. As stated before there are many ways to do this.
It is your call. (We will be posting photos of many of our setups in the
future.)
The multi-channel
setup is rather difficult to make or explain. It requires a 12V 4 pole
relay to activate 2 CB's and another to activate CB 3 and 4.If you want
ME to build you a set up I will. We can negotiate the cost depending on
what type of setup you want.
If you have
any questions, e-mail Rhino at rhino@deltahawks.org
|
