PHASE TWO
ACTUAL CONSTRUCTION
1. Measurements. Be precise so all the parts fit correctly.
2. Strength. Make sure the design is strong enough to withstand people
crawling over the sides of it. If you build a forward windscreen remember
that people will lean on it for support when entering/exiting the cockpit.
Because of its position they will do this even if you tell them not to
because it is in a handy place to grab for support.
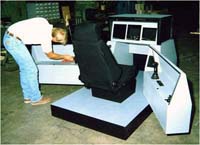
3. Mobility. Either build your cockpit small enough to fit through any
doorway or build it so it can be disassembled relatively easily. If it
is simple to disassemble, this will also mean that it is much easier to
take apart for maintenance and upgrades.
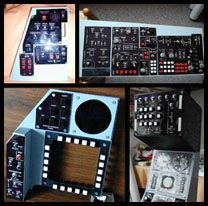
4. Quick Disconnects. If your cockpit's basic construction is of wood
then use screws instead of nails. If it is metal, use bolts. For your side
panels, main instrument panel, and gauges utilize quick disconnect points
for the wiring so that the panels can easily be fixed or replaced.
 5. Cardboard. Many times it is a good idea to use cardboard as a template
before cutting out a part from material that you had to pay your hard earned
money for. I used cardboard as templates
5. Cardboard. Many times it is a good idea to use cardboard as a template
before cutting out a part from material that you had to pay your hard earned
money for. I used cardboard as templates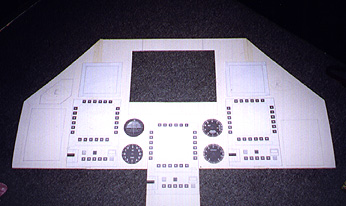 for the metal skin around the forward windscreen of my sim. Cardboard can
be picked up for free at many stores, if you ask some stores will save
it for you. At an appliance store I got refrigerator boxes. Also, electric
tin cutters are great for cutting cardboard quickly and easily. If you
need really thin cardboard use those empty cereal boxes that you have been
throwing away after
for the metal skin around the forward windscreen of my sim. Cardboard can
be picked up for free at many stores, if you ask some stores will save
it for you. At an appliance store I got refrigerator boxes. Also, electric
tin cutters are great for cutting cardboard quickly and easily. If you
need really thin cardboard use those empty cereal boxes that you have been
throwing away after 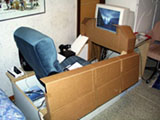 breakfast.
You can also use cardboard to make a part, and then cover it with fiberglass.
This is a great technique for making a glare shield for your cockpit.
breakfast.
You can also use cardboard to make a part, and then cover it with fiberglass.
This is a great technique for making a glare shield for your cockpit.
6. Electrical System. 12 volt DC is great for running many of your cockpit's
electrical systems. If you somehow touch the live wires you won't get electrocuted
and many lights will run off of this voltage, in some cases including real
military lights that are used for back-lighting panels, although some times
they will only work if hooked up to 28V DC. I bought a 12V power supply
from Radio Shack that has a circuit breaker built into it. This feature
can save a lot of heartache if wires get crossed. You could also try using
real  aircraft
circuit breakers placed in the cockpit to protect your electrical system,
and this will add realism to your cockpit. If you have 5 volt edge lit
panels or gauges be sure to reduce the voltage from 12 so that you don't
mess up your expensive parts. If you have a lot of wiring, use relays to
keep the voltage moving.
aircraft
circuit breakers placed in the cockpit to protect your electrical system,
and this will add realism to your cockpit. If you have 5 volt edge lit
panels or gauges be sure to reduce the voltage from 12 so that you don't
mess up your expensive parts. If you have a lot of wiring, use relays to
keep the voltage moving.
Keep all of your lighting in an integrated circuit so that you can
perform realistic start up/shut down procedures. These circuits should
be hooked up to your "generator" switches and the switches applicable to
your start up procedures (external power cart, APU, or whatever system
your jet uses for starting). If your generators switches are not on then
your lights should not work, unless you are hooked up to "external power"
or you have an emergency power system in which case only part of the lighting
system should work.
I have found that I can get a lot usable wiring and connectors out
of bad TVs and VCRs. After all of the money I have spent on real aircraft
parts I do anything I can to keep the cost down in other areas.
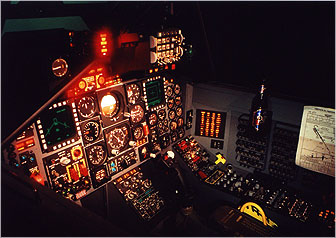
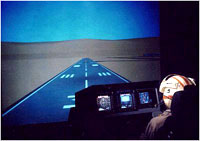
7. Take the extra time to make your instruments and panels backlit,
in low light conditions this makes your cockpit so neat that you will be
thankful you did it. I am going to rework my first panels so that they
can be backlit. If you built your electrical system 12v DC then you can
hook many real military panels right into your lighting circuit. If your
panel requires it, get a transformer that will convert power to 5v.
8. Try to keep the weight down as much as possible and you
might avoid some unexpected problems in the future, such as high transportation
costs. This is also important if it is going to be motion based.
9. Plexiglass. I use Lucite from Lows and have found that the best way
to cut it is to use a bandsaw or a grinder. Take your time and cut slowly
because plexiglass tends to want to crack in the worst possible places.
A jig saw is a bad choice for cutting because it tends to cause the plexiglass
to crack and the jig saw blades get very hot causes and the plexiglass
to melt back together where you just cut. Cutting with a jigsaw is also
very, very slow. It takes a fourth of the time to cut out a panel using
a grinder.
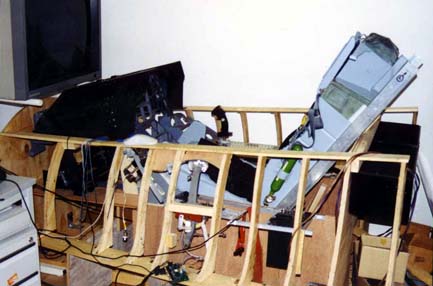
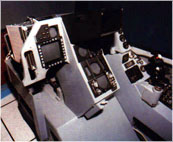
10. The best way I've seen to build a cockpit shell is to build a cockpit
frame that holds plywood in the shape that you want the shell to be, then
cover the thin plywood with sheet metal. The metal makes an authentic looking
and feeling shell and the plywood keeps it very rigid. Without the plywood
the metal bends and makes flexing sounds. If the fighter you are replicating
was so poorly built as to bend and make flexing noises when in service,
then I don't think it is a worthy aircraft to fly or replicate.
11. Keep a fire extinguisher handy. You have lots of electrical wiring
around what is possibly a mostly wood frame. I remember when a guy was
in his pit and it actually did catch fire from a short in the wiring. The
only wet thing close by was the beer in his hand so that's what he used.
Later he joked about making the fire extinguisher handle in the cockpit
really functional, just in case it happened again.
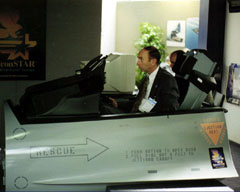
On a personal note, I like my simulators to look just as real on the
outside as they do on the inside. I have even placed warning decals on
the outside of the cockpit like they would be on a real fighter. You can
use the cool decals
here at the SimPits web site by printing them with your printer then covering
them with laminating material. Some of the best looking decals are done
the old fashioned way; making a template for use with spray paint. This
is supposed to be a kick butt fighter and when someone first lays their
eyes on it, it should be obvious that this cockpit is simulating a fast
and ferocious killing machine!
In summary, check out the basic construction designs here at the SimPits
web site and at other peoples web sites to be sure that you don't copy
other people's mistakes. It is common for people to continually upgrade
and improve their sim, after all, that is half the fun! It may be a never-ending
project but the experience and the things you will learn are sure to make
it more than worth your time.
Copyright © 2000 Justin Messenger