How To Build a Toggle
Switch To Function With a Keyboard or Emulator
 When building a flightsim cockpit, there are hundreds of little projects
in the way of your dream that seem to materialize out of nowhere.
One of these surfaced one day while I was working on the instrument panel
for my 2-seater home cockpit. How was I going to interface all of
these switches, lights, and knobs into my pride and joy? How am I
going to pay for it? There are a few solutions out there in internet
land that do an excellent job(such as the EPIC card and peripherals), but
the COST is an obstacle to some of us. I cannot justify spending
near 1000 dollars to get a complete EPIC system up and running right now
I still gotta eat, people! However, I will use it in the near
future, after my budget gets replenished from the general construction
of the cockpit.
When building a flightsim cockpit, there are hundreds of little projects
in the way of your dream that seem to materialize out of nowhere.
One of these surfaced one day while I was working on the instrument panel
for my 2-seater home cockpit. How was I going to interface all of
these switches, lights, and knobs into my pride and joy? How am I
going to pay for it? There are a few solutions out there in internet
land that do an excellent job(such as the EPIC card and peripherals), but
the COST is an obstacle to some of us. I cannot justify spending
near 1000 dollars to get a complete EPIC system up and running right now
I still gotta eat, people! However, I will use it in the near
future, after my budget gets replenished from the general construction
of the cockpit.
But what do I do in the meantime? After looking
around some more on the net, I ran across a couple of items called keyboard
emulators. They werent as versatile as the Epic, but they were a
far cry from propping the keyboard up next to you while you try to do some
serious flying. Another thing about these emulators is that you can
only use momentary push-button switches, no toggles or knobs. No!
Since I am building a civilian-type cockpit, the toggles were a must.
After dwelling on this problem for a little while, I decided to try to
make a toggle switch that just acts like one keystroke when it is switched
on and off. It seemed a complex task at first while I thought of
various circuits and gizmos that I would need, and then it hit me.
Could I not modify the switch by putting a momentary switch inside the
toggle, so when you push the switch down the momentary switch activates
as the toggle moves past the center? Thats it!
It sounded easy (almost too easy) to do
and by gosh
it was! The whole process of converting the first switch took about
15 minutes, and they got a lot faster with each one I built. They
act completely like a keyboard key-press as far as the computer is concerned.
After building a few, I decided to share the idea with all that are
in this great hobby. I hope that other builders out there can benefit
from my tinkering. Here it is:
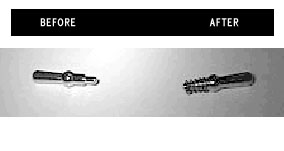
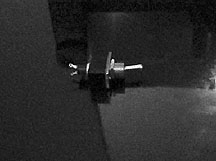 As
you can see, there is a momentary push-button switch sticking out of the
bottom. When you activate the switch, you can not tell that it has
been modified
it still feels right. As
you can see, there is a momentary push-button switch sticking out of the
bottom. When you activate the switch, you can not tell that it has
been modified
it still feels right.
To get started, you will need a few things.
I bought the toggle switches and all other goodies at Radio Shack.
The toggles that you want are the single-pole, single-throw type (SPST),
and it came in a package of three assorted toggles. The momentary
switches are the mini type, NOT the micro type. They come in a package
of four. Each package of each type of switch will cost you a scant
2-3 dollars. Not bad! Other things you will need are shown
in the picture below: To get started, you will need a
few things. I bought the toggle switches and all other goodies at
Radio Shack. The toggles that you want are the single-pole,
single-throw type (SPST), and it came in a package of three assorted toggles.
The momentary switches are the mini type, NOT the micro type. They come
in a package of four. Each package of each type of switch will cost
you a scant 2-3 dollars. Not bad! Other things you will need
are shown in the picture below:
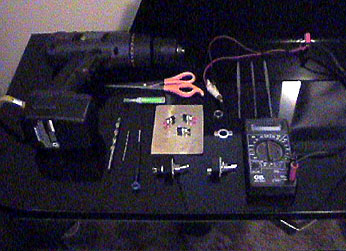
a drill, pliers, small Phillips screwdriver, 7/32 & 1 inch
drill bits, super glue or epoxy, scissors, small rounded files, THIN
brass sheet(I mean thin, almost paper thin), and a voltmeter(not required,
but helpful).
|
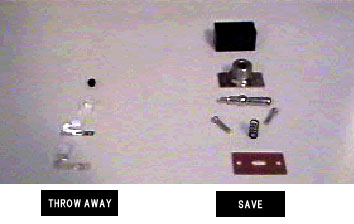
<< 1. Remove the two screws that
hold the switch together, being careful of the small spring and other parts
inside
See << |
|
2. Carefully remove ALL parts from the inside
of the switch, being careful not to lose any. Some parts will be
used again, but the actual contact pieces of small metal inside (3) and
the small cap on the spring will be discarded. >>
|
 |
|
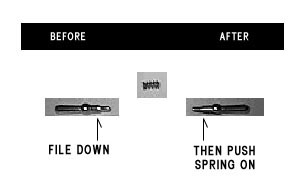
3. The first modification will be made to the actual
toggle lever itself. What we want is for the little spring that was
inside to slide onto the toggle shaft from the BOTTOM, underneath the ball
that the lever pivots on. This will not fit onto the shaft at first,
so the shaft needs to be filed a bit to allow the spring to be pushed up
to the ball on the shaft. Try to get a taper on the shaft as you
file, so the spring will fit tightly on the shaft near the ball.
>>
|
 |
 |
<< 4. push spring onto shaft.
Try to get it on far enough so there is a small portion of the bottom of
the shaft coming through the bottom of the spring. |

|
<< 5. Now you need to drill a small
hole (7/32 or close to that) in the center of the bottom of the switch
case. Look into the inside of the case to be sure you are in the
CENTER of the little space where the spring and contacts were. BE
CAREFUL!!! The case is brittle, so go slow as you drill.
Then enlarge the hole to 1 inch, watching all the time to make sure that
the hole doesnt wander off center. If you have to wallow out the
hole a bit after you drill it to make the hole centered, that is ok
but
not too much! |
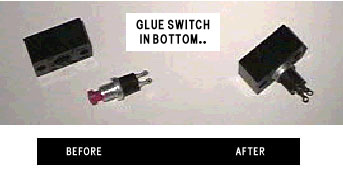
| 6. Almost done! It is a lot easier
than it seems, isnt it? Next, we will glue the momentary switch
in from the bottom of the toggle case. I used superglue, and it worked
like a charm
just be sure that the momentary switch is in the center when
you are done. This is the critical part. >> |
|
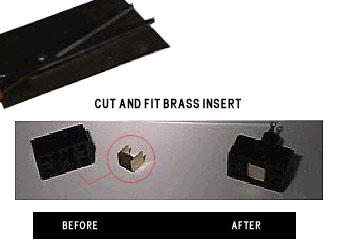
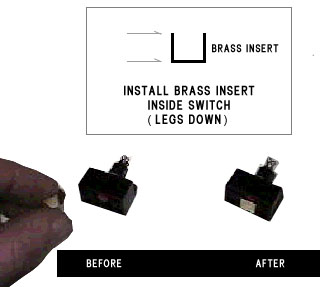
| 7. Now, we must cut a small piece of
thin brass to sit on top of the button that is now inside the case
to provide longevity and wear protection to the switch. Cut the piece
of brass into a 1 inch wide, by 13/16 inch long strip using scissors, then
bend it 90 degrees approx. 1 inch in on each end. You want to end
up with a u-shaped piece that has 1 inch sides and a 5/16 bottom, like
this:
!__!
This will fit over the top of the momentary switch with the legs going
down. Fiddle around with the brass, making adjustments to it as needed
to obtain a loose fit within the case (no binding). >> |
|
8. Put brass piece in on top of switch,
making sure that it can wobble around a little
>> |
|
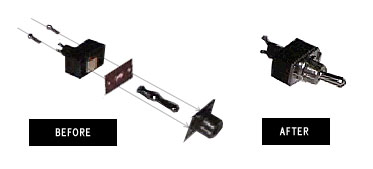
9. Assemble all of the components by
putting the toggle lever into the metal socket that it rides in, spring
down, then the wafer spacer, then on the switch case with the brass inside.
Press it all together and put the screws back in, and
..Presto!
All done.
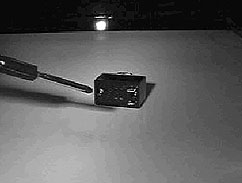
Test out the feel of the switch.
Works well, doesnt it? >> |
 |
|
10. The last thing to do is test the functionality of the switch.
Connect a continuity tester (or a simple light bulb- battery testie-
thingy) and operate the switch. It should momentarily complete the
circuit as the lever moves through the center of travel, then snap to the
limit. All of the ones that I built worked the first time around,
and they are a joy to use in the cockpit!
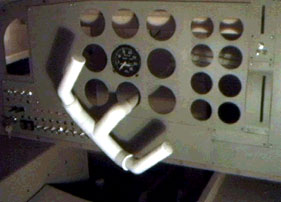
<< I included a photo showing some of these switches installed
in my preliminary panel, and one showing the earlier construction of the
cockpit enclosure to give folks an idea of what I am doing here(by the
way
the yokes are linked; another successful project): |
Anyway
tryout these switches. You will enjoy
them, Im sure. Feel free to contact me for your comments
or complaints J at: reeoch@hotmail.com,
or go to my cockpit site at: http://www.reeoch.8k.com
Happy flying!
Rich Anderson
|
 |
Copyright © 2000 Rich Anderson
|
|
