
Bobĺs Home Made Throttle
By Bob Donovan
I have wanted to build some sort of throttle for my computer for all the various flight simulators I enjoy. As with all of my projects, I had only a few requirements: A simple no-brainer design, low cost, and USB connection. I came across the idea for this throttle design at work, where one of my duties was the demolition of 2 standup forklifts. The throttle controls on this type of truck were perfect to be converted into a single lever throttle, with the added bonus of 3 push buttons that will also be utilized.
My first task was to gut the assembly and thoroughly clean out 20 years of dust. I also removed the twist-grip handle and its return spring and replaced them with a fabricated lever from an old piece of woodworking equipment. The accelerator pot was then replaced with a 100k pot from Radio Shack. The gearing in the box utilizes almost the entire range of the new pot, and stops for over-travel were already built in.
My next job was to find a way to connect this set up to the computer. I wanted a USB connection, so I decided that a Game Port to USB adapter was the easiest way to go. To solve the problem of finding a cable and male DB-15 connector, I just purchased a Joystick extension cable and cut off the female end.
Here is a pic of the throttle with the cable installed. The pot wires are already soldered in place. The 4 wires on top are to be connected to the 3 pushbuttons, and the wires terminated with butt splices are not being used.
This is the throttle with the pushbutton switch assembly installed, before the cover and buttons are screwed in place:

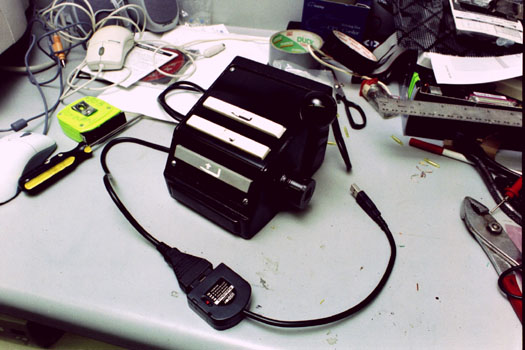
Here is the finished unit showing the DB-15 connector and the Game Port to USB adapter plugged in. Well organized workbench, huh?
WIRING:
A little info on the wiring, and how I had to do it: Having a sealed DB-15 connector and wire made it impossible to visually tell which wire went to which pin on the connector, so I just tested each one with a continuity tester and made a little chart of wire colors and corresponding pin numbers. I was able to find the pin designations from various sources after a Google search for "Gameport wiring" This is a sample diagram: (This is the view from the connector end, not the back side)
I used the connections for the joystickA, x-axis, button 1 and 2, and the button 1 for joystick B.
This is the basic wiring diagram I used:

CONNECTION and CALIBRATION:
The last task is to connect the unit to the computer and calibrate it. The USB adapter has a selector switch that must be set to "Joystick A" before connection. I use Windows XP, so the procedure is to go to Control Panels Ś Game Controllers Ś click on the USB Adapter and then on properties to calibrate and make sure that the buttons all work.
The new throttle controls are assigned just like any other joystick controller in most flight simulators in the controls set-up menu as the USB Adapter, although in IL2 FB it has to be configured under the HOTAS controls.
CONCLUSION:
It is always a good idea for the frugal (cheap) flight simulator enthusiast to keep an eye out for any odd piece of "stuff" that may come in handy in creating components for that home cockpit. For about $35 and a little time I have a nice smooth throttle lever with 3 buttons to boot!